

 Add to favorites
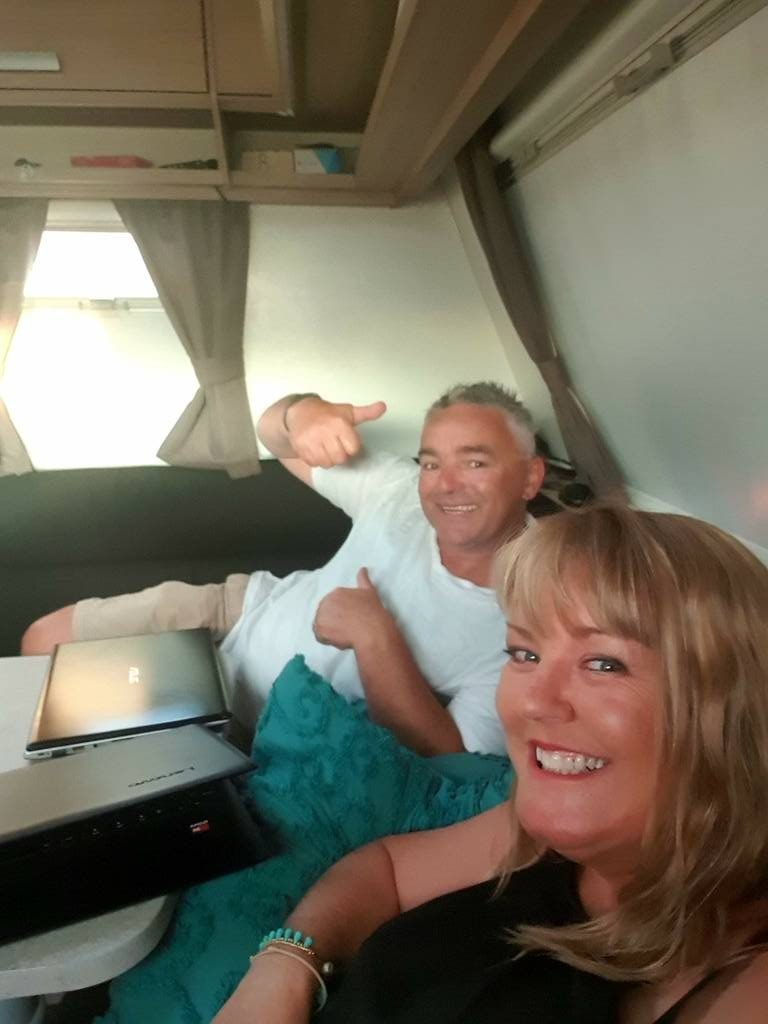
We decided to get Starlink RV Internet while farm sitting out on a rural property for 3 months. As we live in our van full time and use the internet every day it was a no-brainer for us to get it.
Larry uses the internet for his learning and writing code as well as for Larry’s smart caravan features. I also use the internet every day for writing here on our website and on our Full Time Caravanning Facebook page. Not forgetting using the internet for streaming services as well as TV channels on our smart TV when our TV aerial doesn’t work in certain areas. Previously we have used RV WiFi and the Night Hawk, I’ll talk a little about those later.
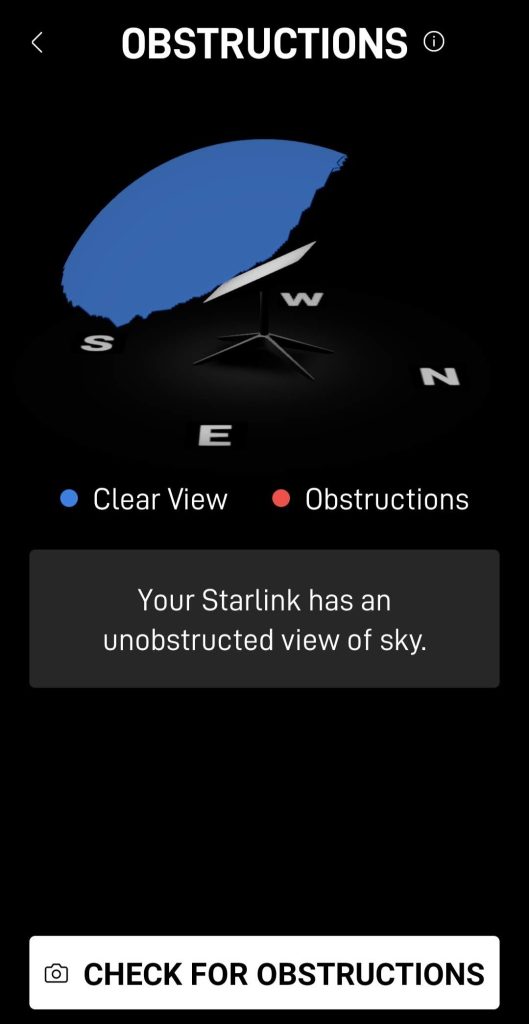
Starlink is a satellite internet company operated by SpaceX, yes the one owned by Elon Musk. They have around 4000 satellites orbiting the earth at this time and more are going up as I type this. The satellites now provide full coverage anywhere in Australia, where as a year ago only parts of Australia could get it. As they are satellites, as long as your dish has a clear view of the sky, you can be in a remote or rural area and they claim you can still get good internet reception. In fact, Starlink can work better in these types of places as cites can have buildings that block the satellites view.
With the Starlink RV Internet you have to worry more about parking under trees etc so the dish (or Dishy as Elon refers to it) can find the satellites. When you order Starlink you get access to download the Starlink app. One of the features of the app is to check for obstructions by pointing your phone at the sky and seeing if dishy has an obstructed view of satellites or not.

The Starlink RV Internet is designed for travellers who use Starlink in different locations. You can also buy the regular stationary Starlink for your home. The home one is cheaper per month at $139, but it can not be used for travelling. In saying that I believe you can change it to be for your RV but then you can’t change it back to a home one again and vice versa.

A bonus for the Starlink RV internet is that you can pause and un-pause your Starlink RV plan. Great for those who only travel for part of the year. Also, a big bonus for us full time travellers or those working on the road, the $174 a month is unlimited data!!
We were spending at least $30 each, per month, on our mobile phones. Plus $85 per month for internet on our Telstra router sim card. We can now get rid of the Night Hawk router and Telstra sim if we wanted to, but we’re keeping it for now. If we are stationery for a few months or more and the Night Hawk is working ok, we can pause the Starlink and use the Night Hawk again. At the moment we have decreased the cost of that Telstra sim to the minimum plan which is $25 per month. We’ll see if it’s worth keeping over the next few months.
For us personally, $174 for unlimited internet is fabulous and for Larry the concept of not having to deal with Telstra or worry about intermittent internet is a bonus!
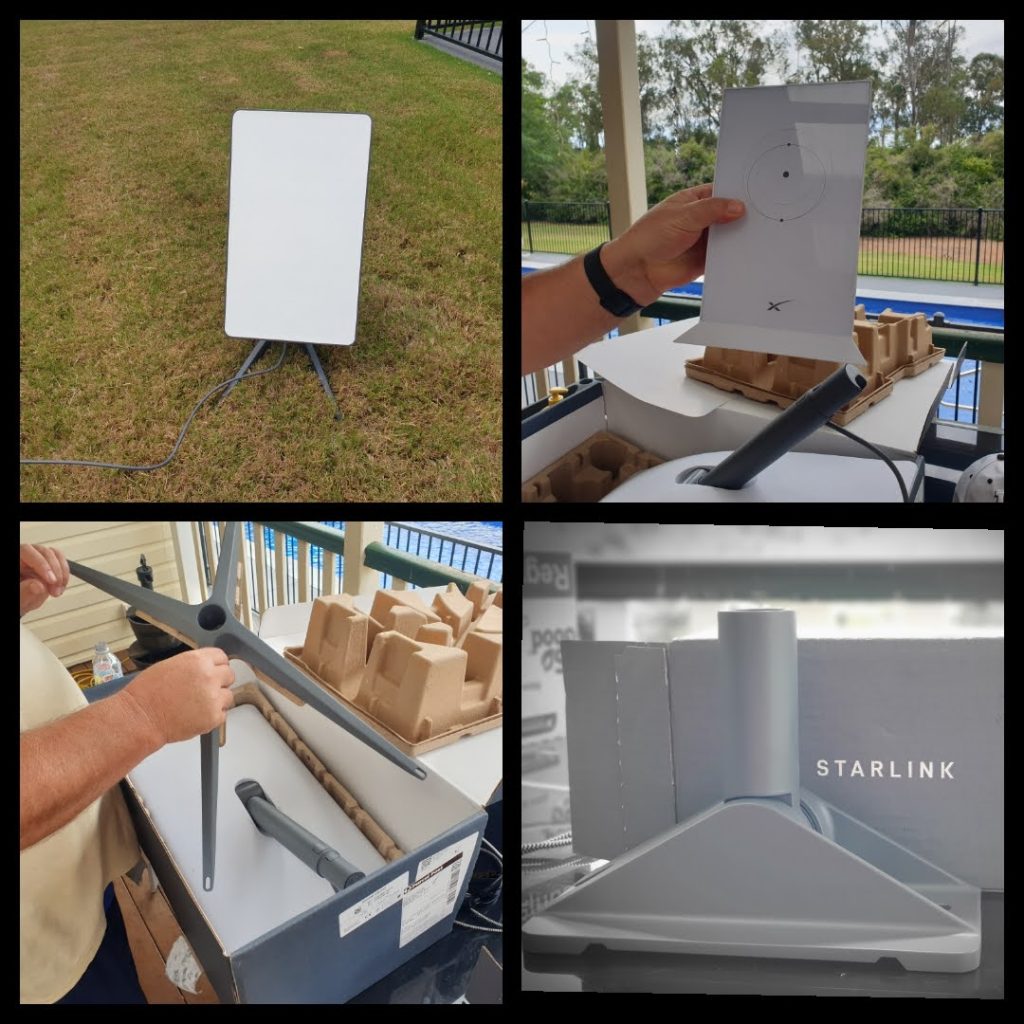

Our roof mount came within just a couple of days. The large box with the Starlink RV Internet kit came not long after. Larry was like a kid at Christmas waiting for it to arrive and unboxing it. I particularly liked the instruction book. Part of which states, damage by Dinosaur is not covered in the warranty 😀 You have to appreciate the lightheartedness in what is usually a boring instruction manual.
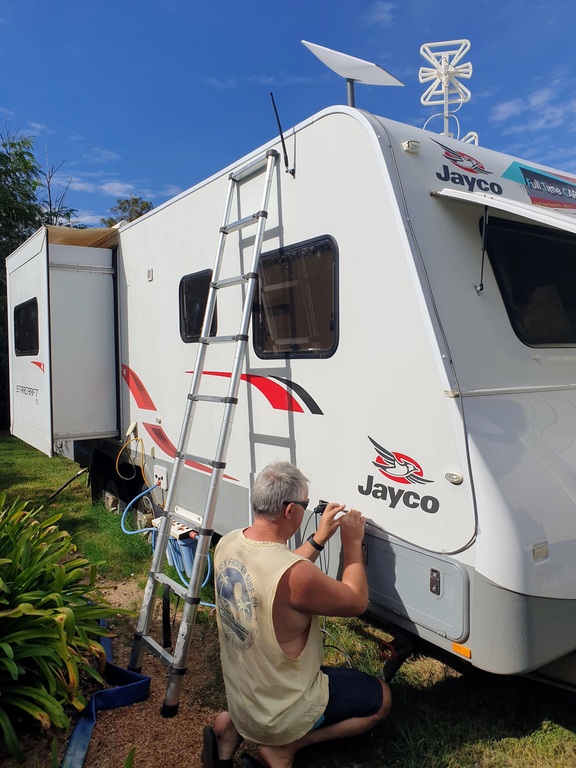
Obviously when the box arrived Larry wanted to get straight into it and set it up. A storm was about to come through but that didn’t put him off. He wanted to know if it worked and how well it worked compared to the ABN we had been using at our Farm sit. After plugging in the Starlink WiFi Router in, plugging the dish in to the router then logging in to the Starlink app, Larry scanned for satellites with his phone.
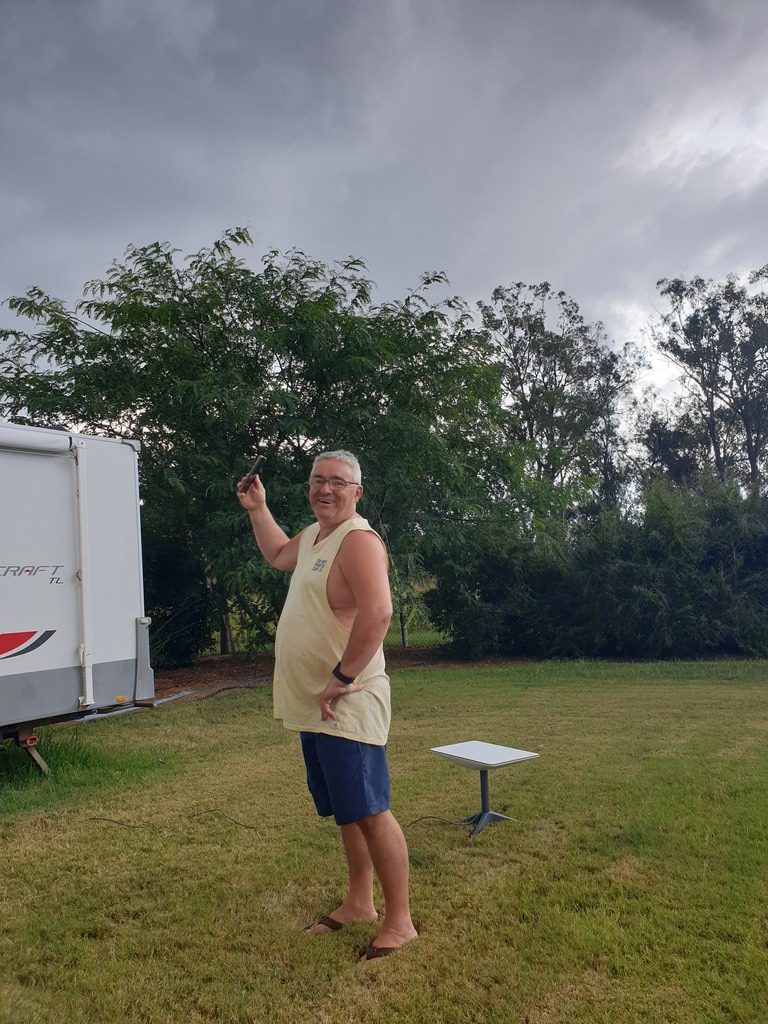


With the dish on the ground, about a meter from our caravan, it started to move and turn finding any SpaceX satellites above. Within a couple of minutes it had found a multitude of satellites. Seconds later strong winds came through as did some heavy horizontal rain.
I’ll let Larry intervene and explain more here
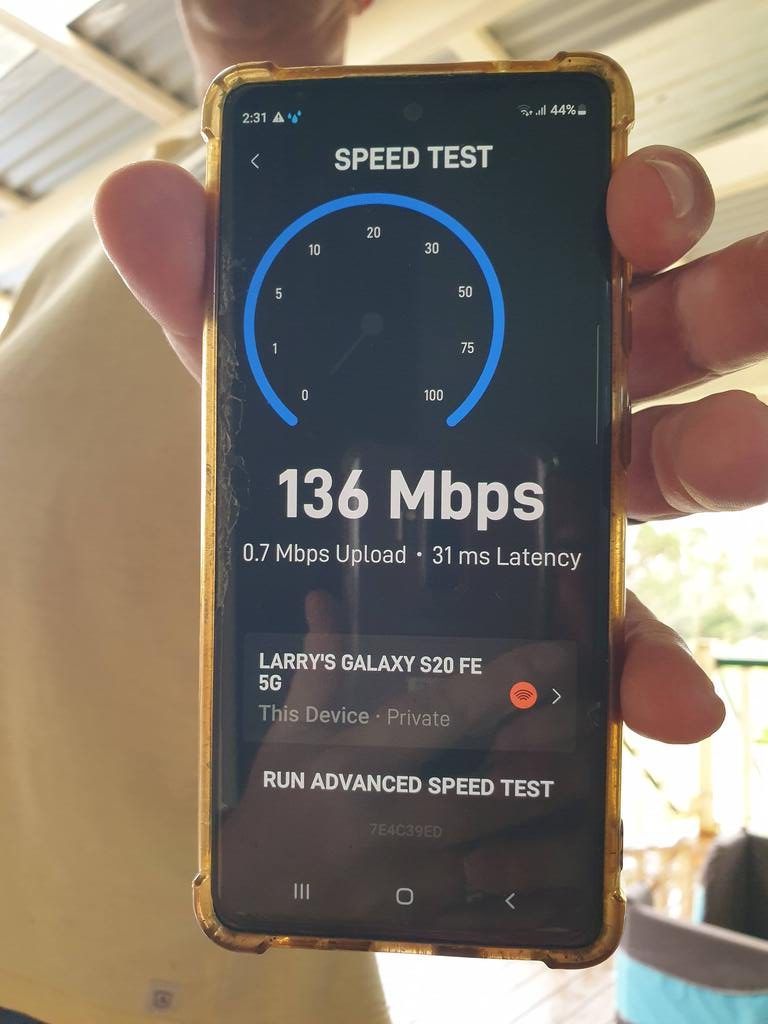
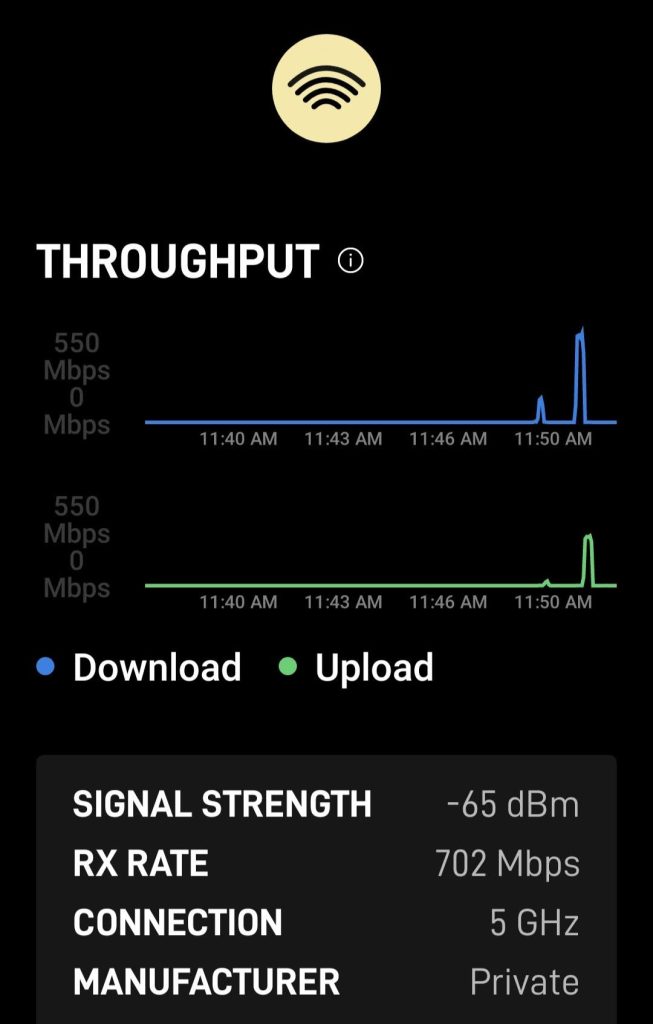
Checking to see what the up load and Download speed was. With the wind, rain and cloudy sky, our new Starlink RV Internet was showing a speed of 136 Mbps download. Compared to the NBN at the Farm Sit, which was 2Mbps We were thrilled. Just to note this is speeds based on one connected device. When you connect more devices the speed is shared between devices so the numbers look smaller initially. But even still, with multiple devices connected, it hands down beats anything Telstra 4g has been able to provide.
Having used our Starlink RV Internet for a few days, and loving it, Larry wanted to make it easier to connect and set up. Moreover, upon reaching and leaving our destination. This could be achieved by putting shielded Ethernet ends on the existing router and dish cords. And then, putting a data connector between the inside and outside of the van to connect the two. Ultimately, we would only have to plug in and unplug the dish from the van when we stop or move on. I’ll go in to how and where in more detail further down.
As mentioned, we have previously used RV WiFi. Initially it was better than using our phones as hot spots and Larry liked it as he had hooked up all our caravan home assistant stuff to it. Larry connected heaps of things in the our van to the RV WiFi making our van a smart van. Things like automating lights and voice controlled stuff, water level sensors and many more. Over time we noticed the internet side (which is why we purchased it in the first place) was lacking. The more we travelled the more we noticed our phones hot spot was working better. We have been using Boost Mobile for years. Like any technology, things improve with age. The RV WIFI now has 5G, maybe it’s better now?
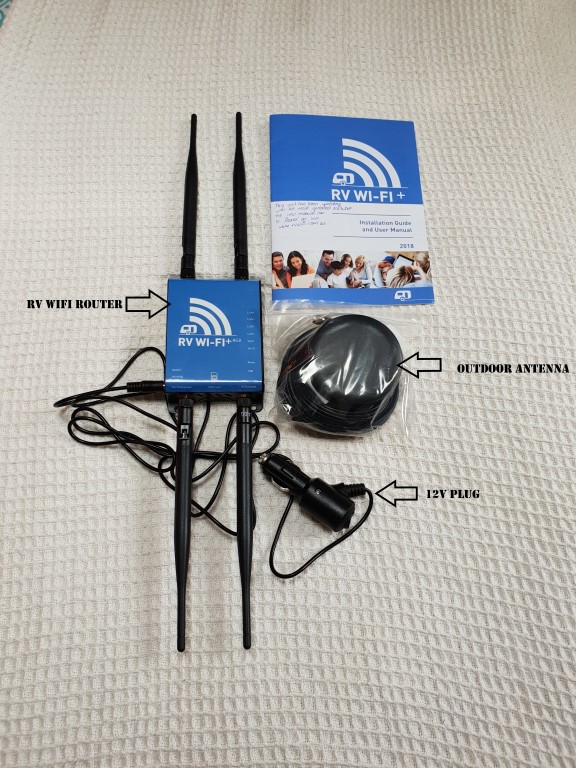
We use Boost Mobile on our phones and we highly recommend them for phone and internet around Australia. It’s been handy in outback places to download movies and cast them to our smart caravan TV. Boost works of the Telstra network and works great in so many more places then other telcos. They are also cheaper than Telstra. One of the reasons we liked having a router for the van, was so Larry could make our home in to a smart van. We decided to try a different router as the RV Wifi was no longer efficient.
The Night Hawk seemed like a good step up from the RV WiFi. Internet speed was quicker we went from 2Mpbs on average with the RV Wifi to an average of 58Mbps on NightHawk BUT, again the more we travelled the more we noticed our Boost mobile and phone hot spot was working better in some poor reception areas. We purchased a aerial to help get a better signal from the Night Hawk, but it still had some issues in areas we travelled to. That probably comes down to 4g coverage being limited in more rural areas and also the lack of towers. It is what it is and I guess you have to expect it’s not going to be 100% all the time.
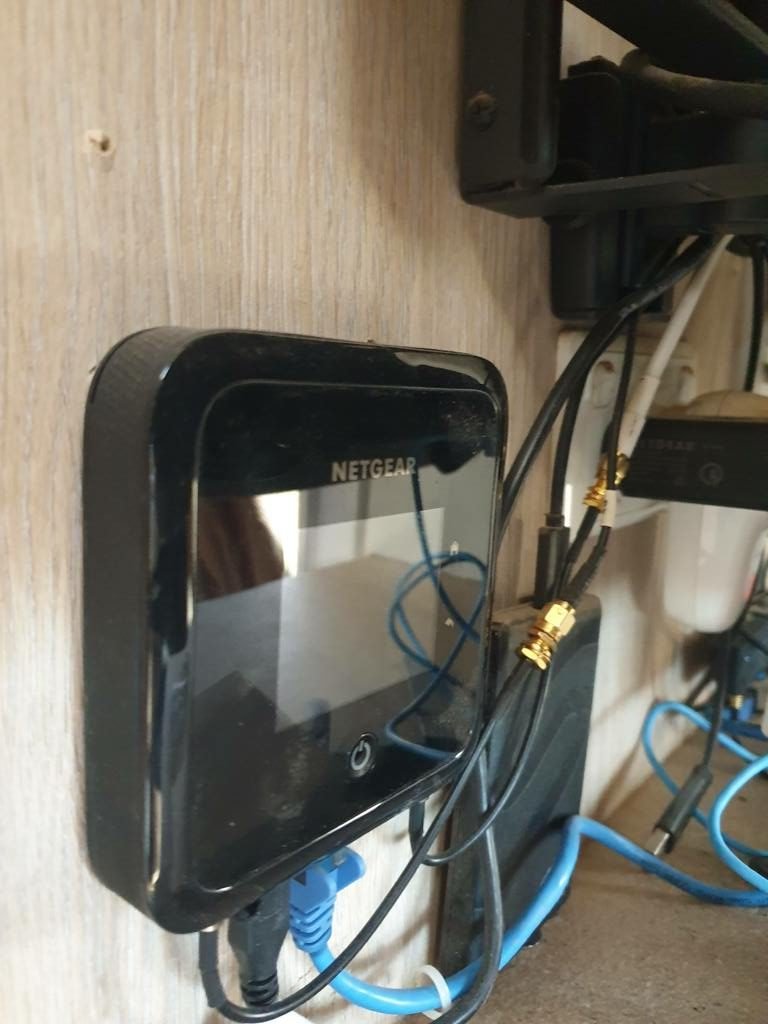
Having transferred all the caravan smart home assistant stuff from the RV WiFi to the Night Hawk, the Night Hawk was still serving a purpose. Unfortunately, sometimes that was only the local network for our vans smart stuff.
Larry being the geeky, techie type, had been reading about Starlink Internet for a while. Once he noticed there was one for us travellers, and that could work in “almost” any place he decided we should give the Starlink RV Internet a go.
Once we knew the Starlink RV Internet was up and running and working amazingly at our Farm Sit, Larry contemplated cutting the wires and adding Shielded Ethernet connections. Larry always has these ideas to change things up so they work better for him or for the van, depending on the situation. I sometimes have to smile, roll my eyes or in this case ask a heap of questions. Why? How? Where, What if? So with that being said, here are the answers:
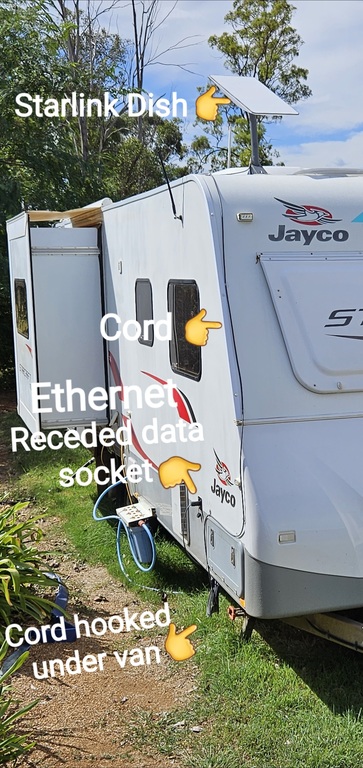
The reason for this is a simple one. The way the connections are now, you have to pass the cord for the dish through a window or some kind of hole (in our case, maybe the top or side vent of the fridge?) to connect it to the router. Not a big deal for some, but, as we live in our van full time, we wanted a more semi- permanent set up. Also, we wouldn’t be happy leaving the dish on the ground overnight.
When Larry said he would cut the wires then attach the shielded Ethernet connector, I was very uneasy. Larry has made, altered and changed many things on many occasions over the years. And, although sometimes at first things don’t go as planned, they normally turn out in the end. He talked me through how he would do it, in fact he told me a few times! until I could understand. I’m a bit technically challenged 😛
Anyway, here’s how he did it…..
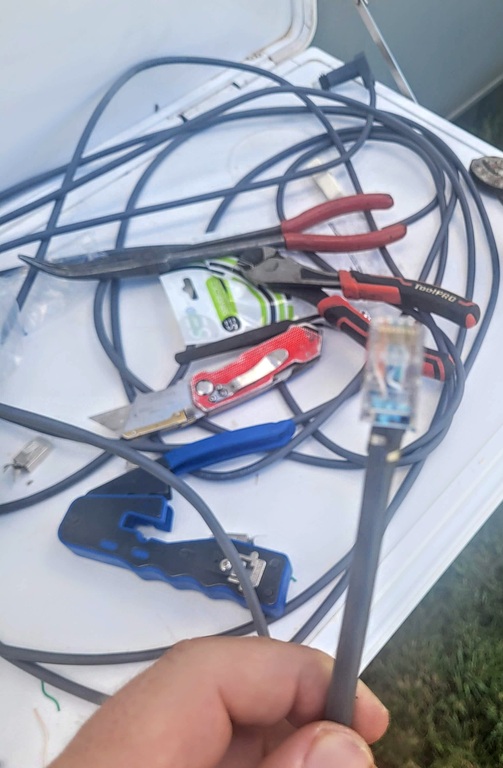
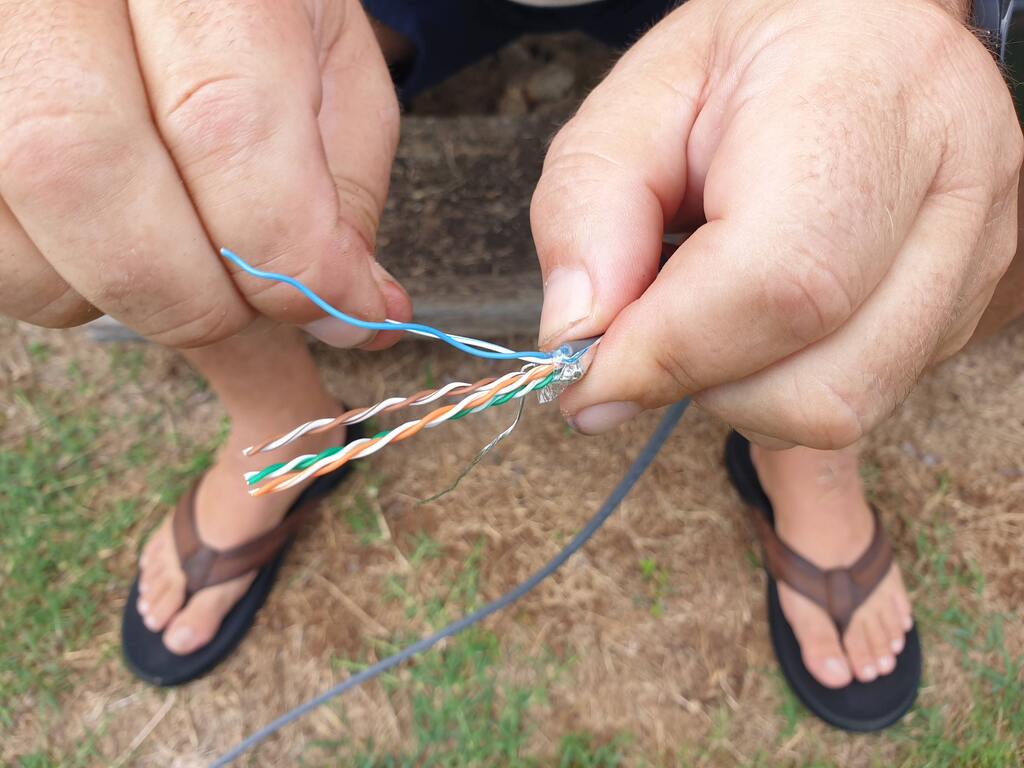
Once he cut the cord to the dish and the router with a all in one tool (the tool cuts, strips and crimps) he slid the joiner cover down the cord first. Then he peeled back the shielding foil covering the wires and separated the wires. Turning what was 4 wires into 8 by untwisting them. These 8 wires now needed to be inserted carefully in to the shielded Ethernet ends, before putting that in to the pass through crimping tool.

Larry also bought a pack of 10 shielded Ethernet ends as he had read that it was very easy to muck it up (The wires and connection were meant to be fiddly).
I’ll let Larry intervene and explain again
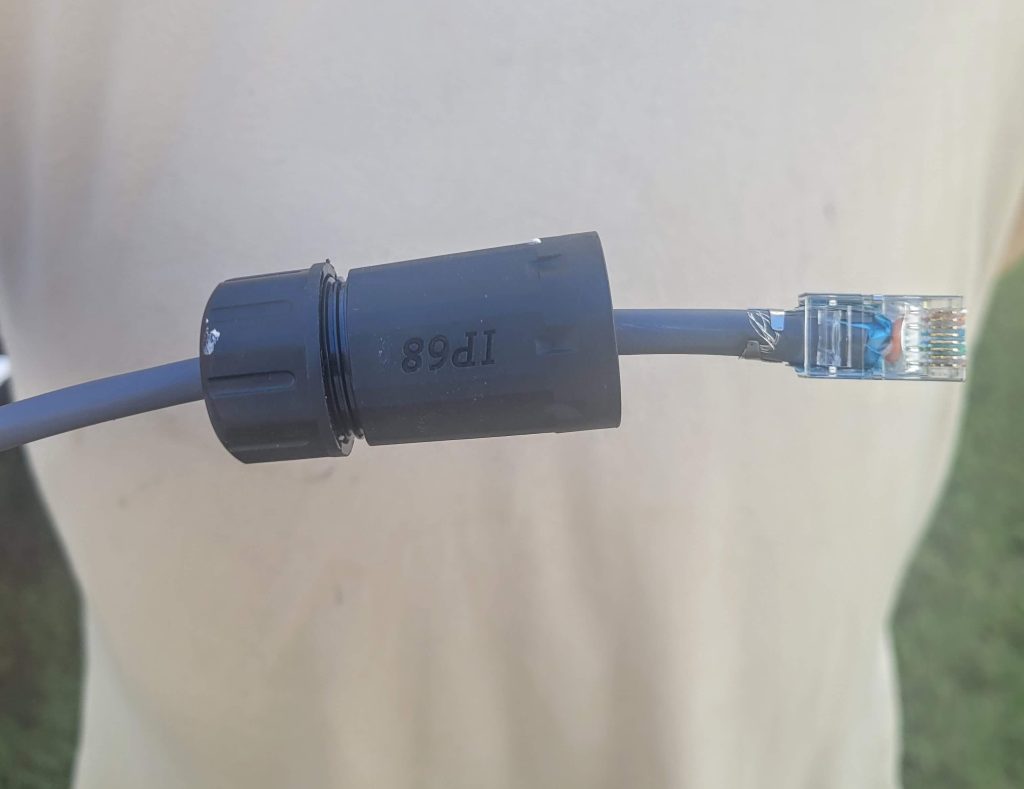
Once the separated wires were carefully put in to the Ethernet end, it was put back in to the all in one tool to be closed, crimped and excess wires cut off. The exact same was then done to the Router cord. The Starlink cable has proprietary ends on it that connect to the router and the dish. What that means is they are ends of the cable that are designed to specifically to connect to the dish and router, you can’t use other cables. However the cable itself is Cat6 cable so by cutting and putting the Ethernet connections on the cable we can retain the proprietary ends but also have connections that are compatible with most Ethernet device, like Ethernet hubs, Ethernet routers etc. In the case a Ethernet pass through wall plate.

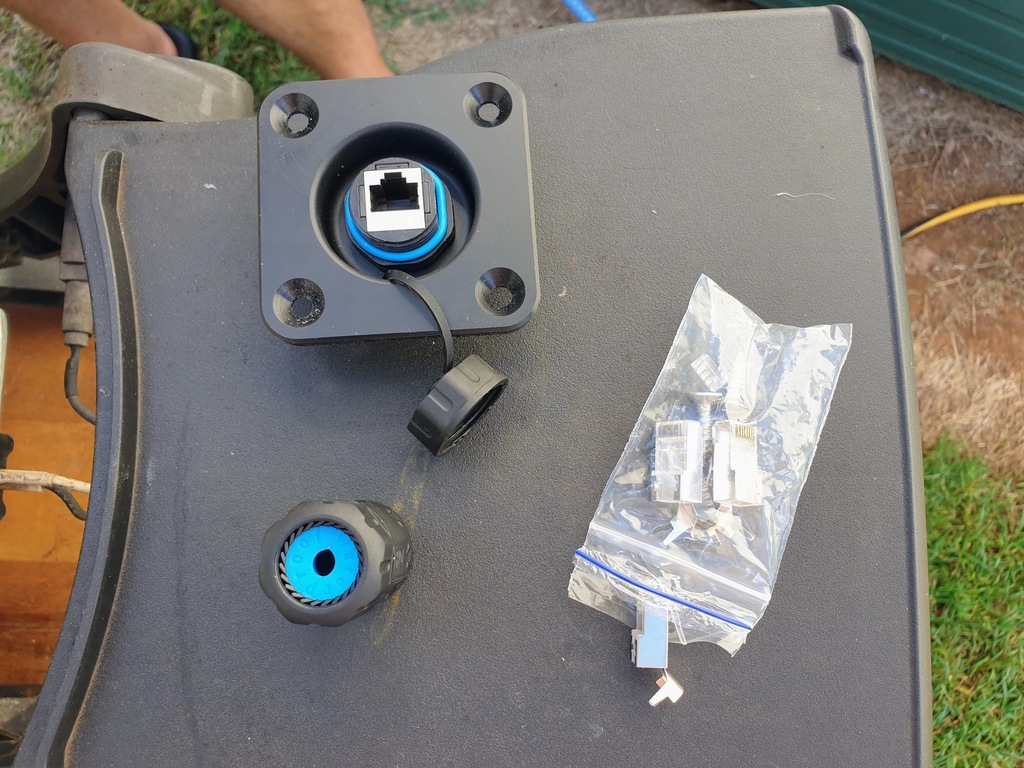
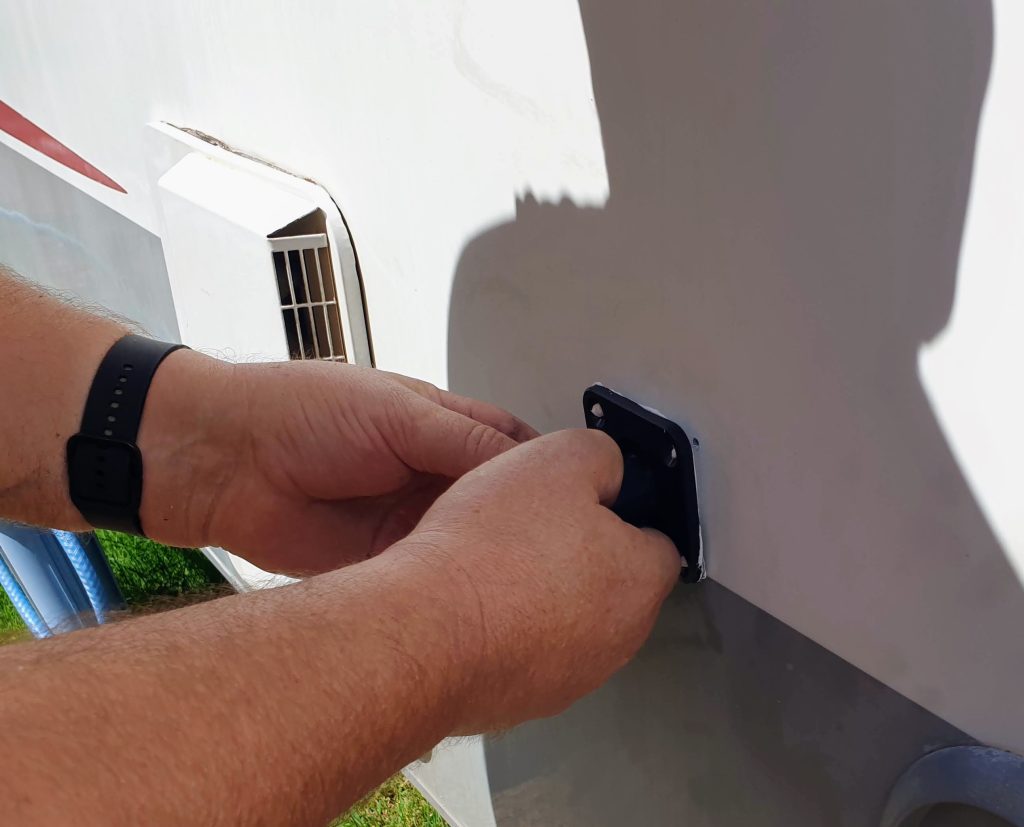
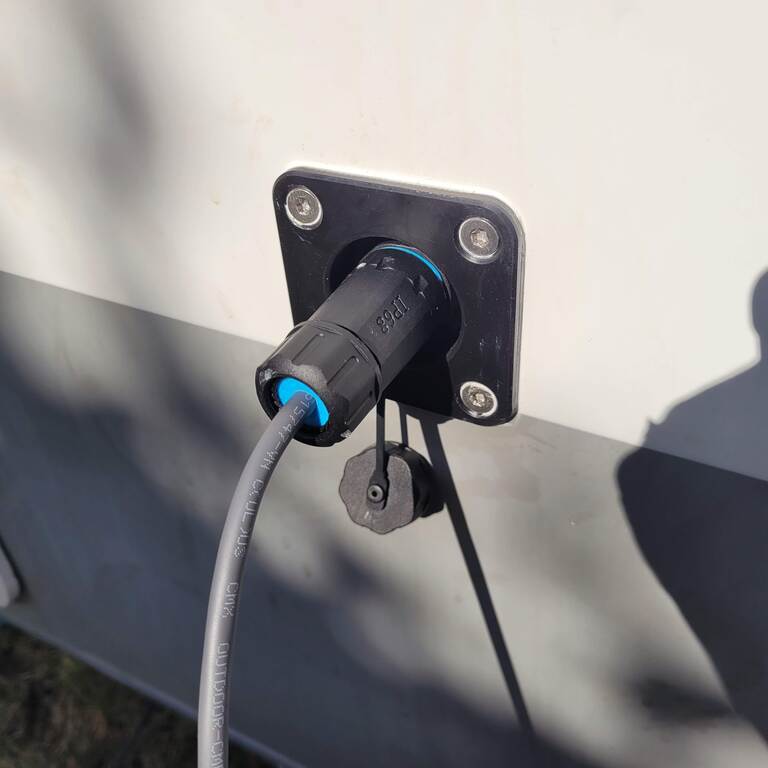
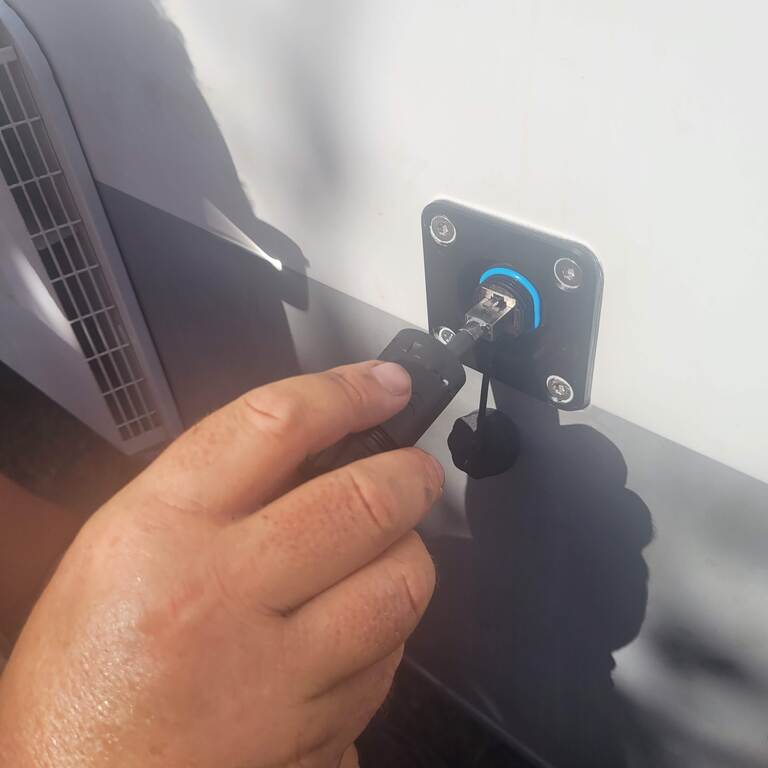
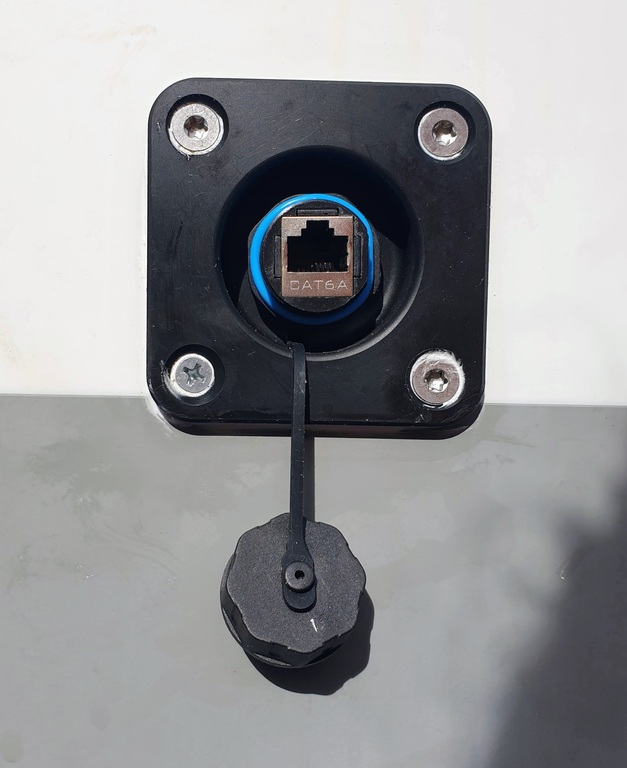
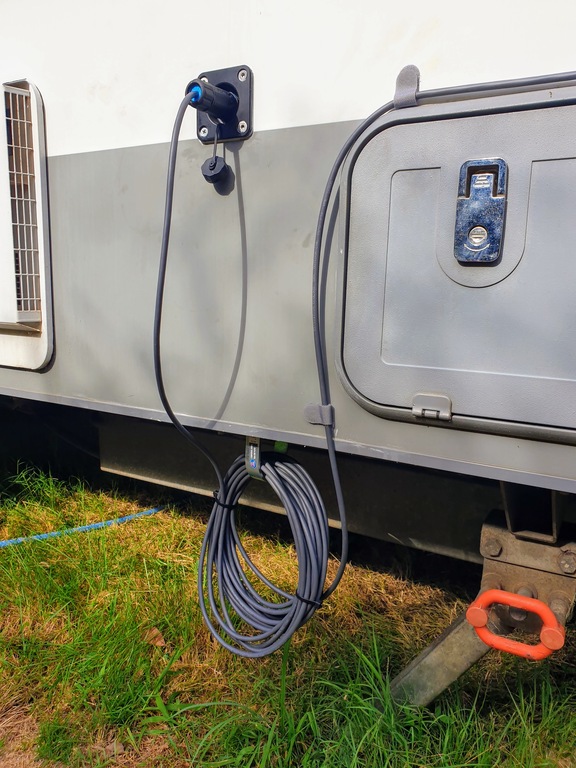
These two Ethernet ends now plug in to either side of recessed data socket and joiner – to connect the external and internal Ethernet ends. Speaking of which, Larry was going to be drilling in to the side of the van, making a hole for the connector. My thought was… Oh’ boy! I’m not to sure about this! or words to that affect ;).
WHERE Will You Drilling A Hole In The Van?
The connector would be put on the side of the van but within the top of the front boot space, not through to the inside of the caravan. Once Larry used his drill with a 51mm hole saw to cut out the hole, he then marked out where the screws for the recessed data socket would go.
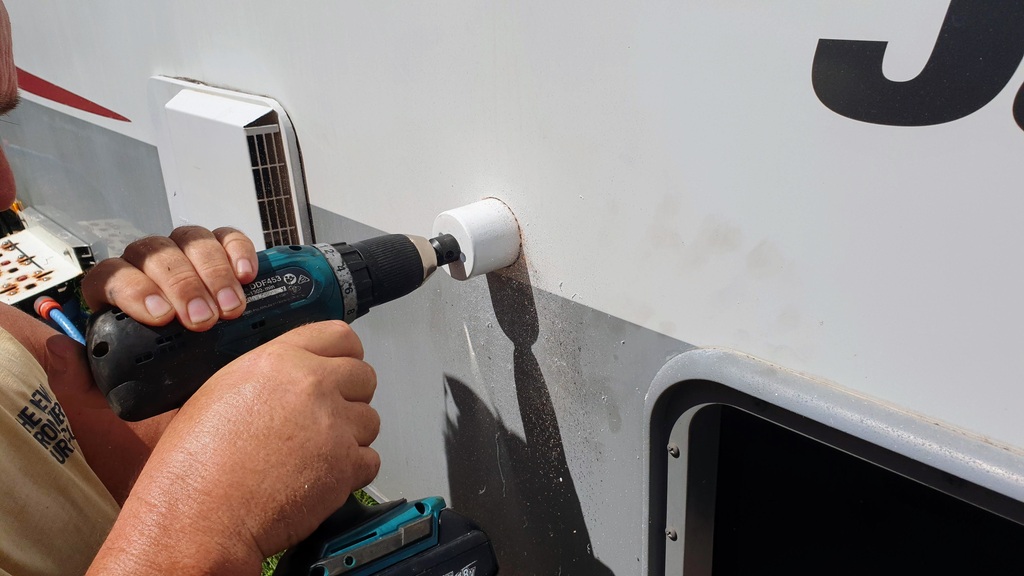
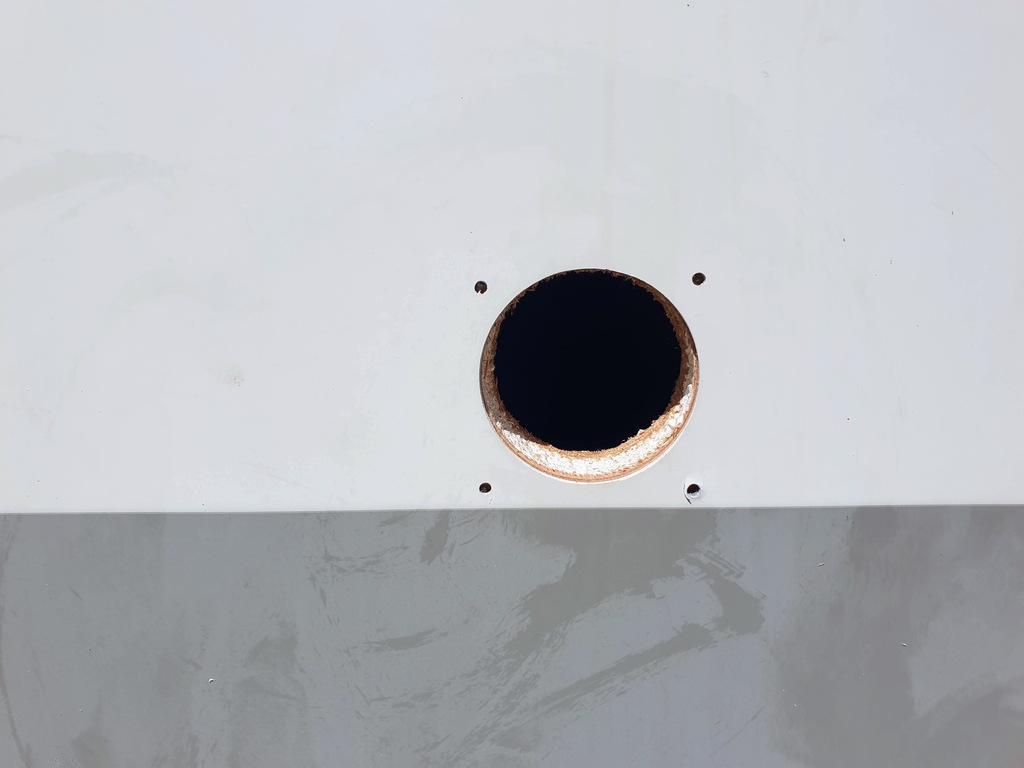

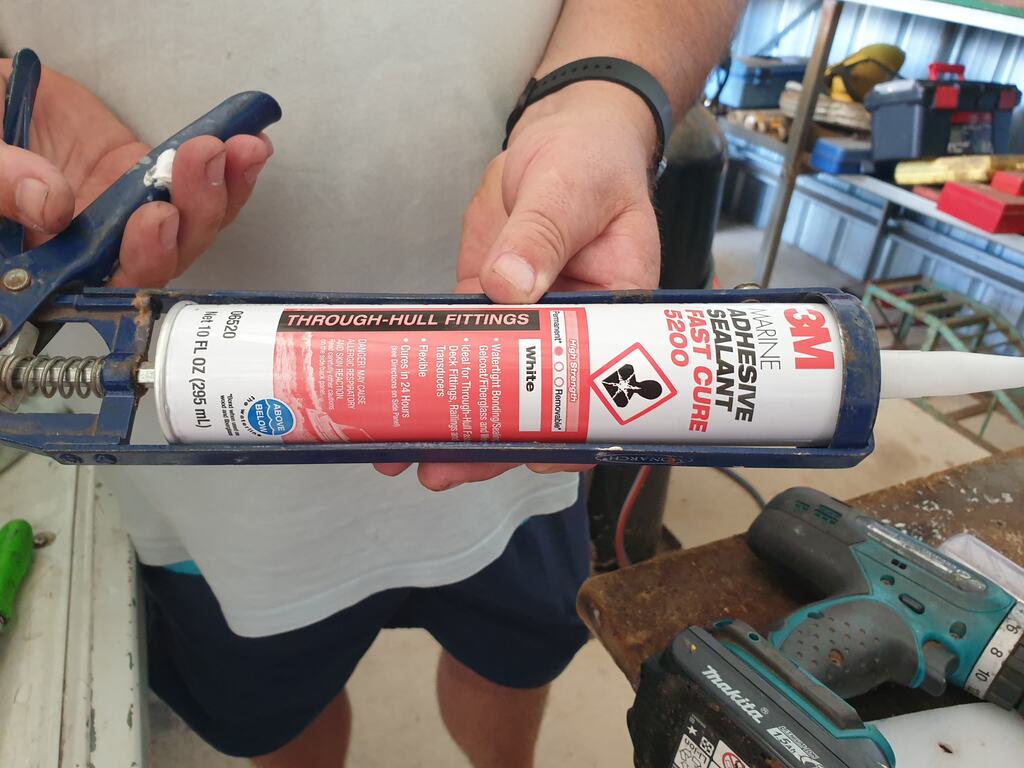
Before Larry screwed the recessed data socket to the van, he used wet and dry silicone (for through hull fittings) around the hole and on the back of the connector. Lastly, screwing it on the van.
BUT … After plugging in the new Ethernet ends it initially didn’t work aahhhhhhhhh!!!!!!!
Nearly all of the Shielded Ethernet connectors were used up trying to get it to work. Some pins looked like they hadn’t penetrated the wires correctly
While taking me through what was happening, Larry eventually noticed that remains of old chopped wires was sneakily caught inside the tool. This was causing the pins not to get crimped into position properly. This had to be the reason it wasn’t going to plan!
With the couple of Ethernet connectors he had left he did the connections perfectly!
But for crying out loud, it still didn’t work 🙁
I could see the disappointment and confusion on Larry’s face. I had a google and went on YouTube to see if I could find anything remotely helpful.
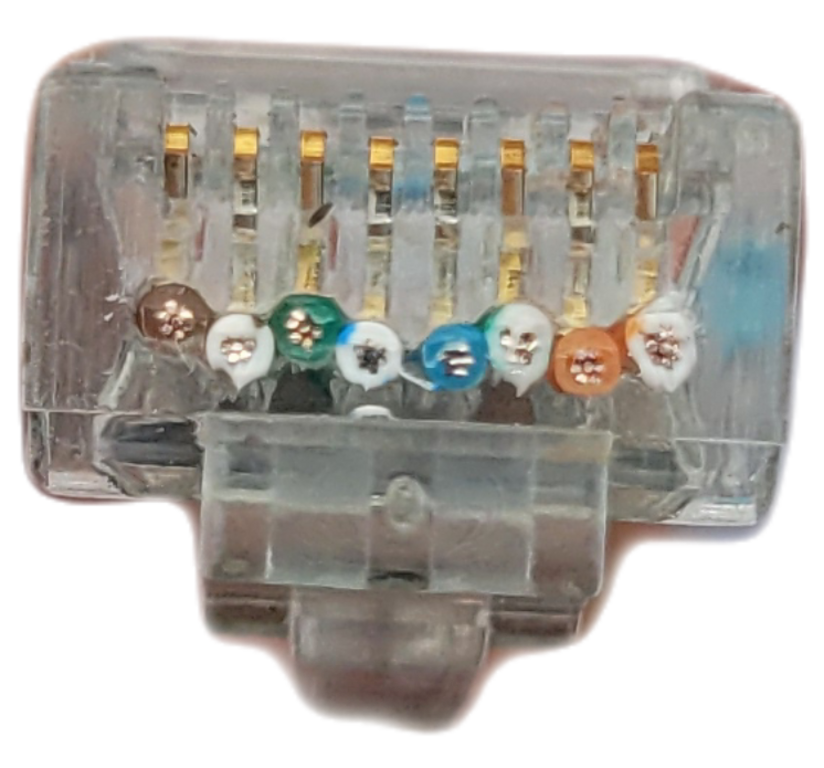
A couple of videos mentions the earthing wire or drain wire as someone else called it. This got Larry thinking. He had tucked this wire under the tail of the shielded connector so that it provided the earth through the shielding of the connector. This is the correct method and the shielding of the connector should then make contact to the inside of the of the data socket and provide the earth to both sides of the data socket. In theory they both should have been fine.
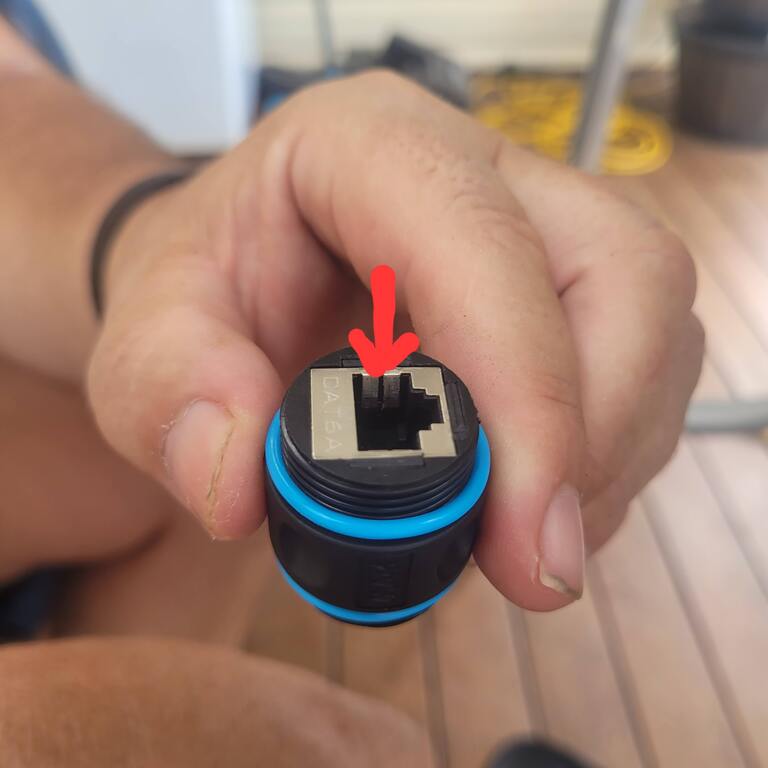
Finally, on closer inspection, Larry noticed that the side walls of the Data connector, were not touching the Ethernet terminal shielding and therefore not transferring the earth. He used a pick to pull the little metal sides inwards, plugged the Ethernet ends back in… AND…. Voila, Whoooo it works!!. Now some say that the drain wire doesn’t need to be connected. However Larry believes it does for the reason that it didn’t work until he made this tweak.
Some quick technical notes from Larry on these Ethernet ends.
If you are contemplating doing similar to us, Larry’s tips are :
1. Use Shielded Ethernet terminals. The shielding protects from signal interference and the cable already uses shielding so it makes sense.
2. Strongly advise getting “pass through” shielded Ethernet terminals with a supporting tail. The pass through side of it allows you to pass the wires through the entire terminal then chop off the excess wire. This makes it way simpler to confirm you have the order of the wires correctly before crimping.
3. By using pass through connectors if you have issues with connections later. You can use a multimeter to test for continuity between the ends of the wire that you passed through and the pins of the connector. That will tell you if its been crimped properly. Would be hard to do that if you didn’t use pass through connectors.
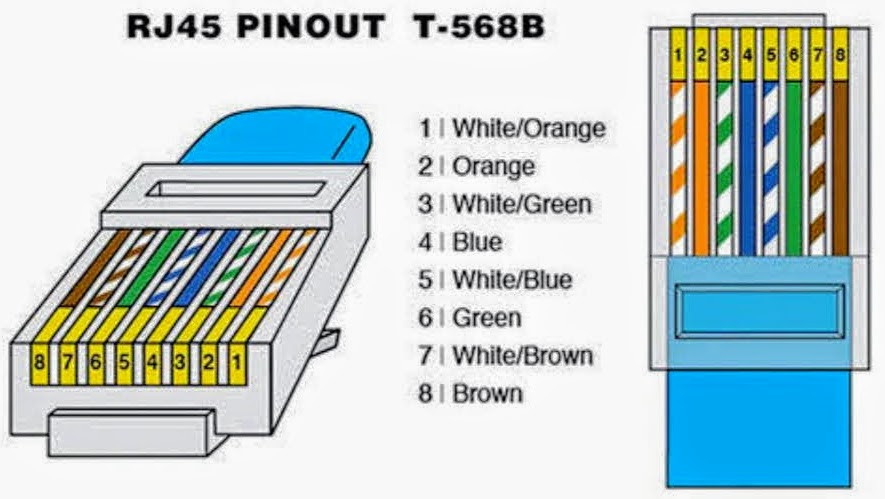
4. Starlink uses the T58B Ethernet wiring schema, so will you 🙂
In our van the best place for the router to live was on the shelf behind our club lounge. This way the cable from the router could go in to our front boot, under our lounge, to the new connector.
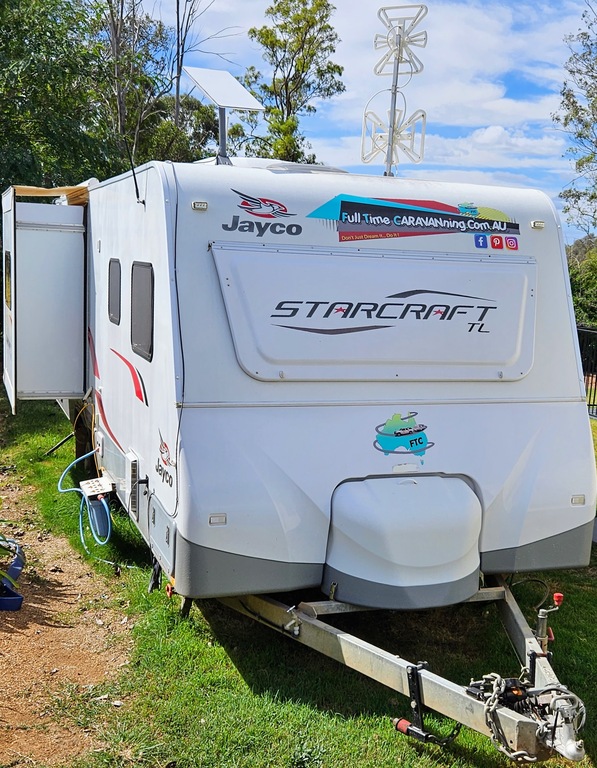
We thought the best side of the caravan for the dish to go would be the side without the awning. We didn’t want to be putting the dish up while trying to lean over the awning if it was out. Larry chose to put the RV dish holder near the front of the van in a place it wouldn’t cast a shadow over our solar panels. Also, hoping the airstream might follow the curve of the van go over the top.

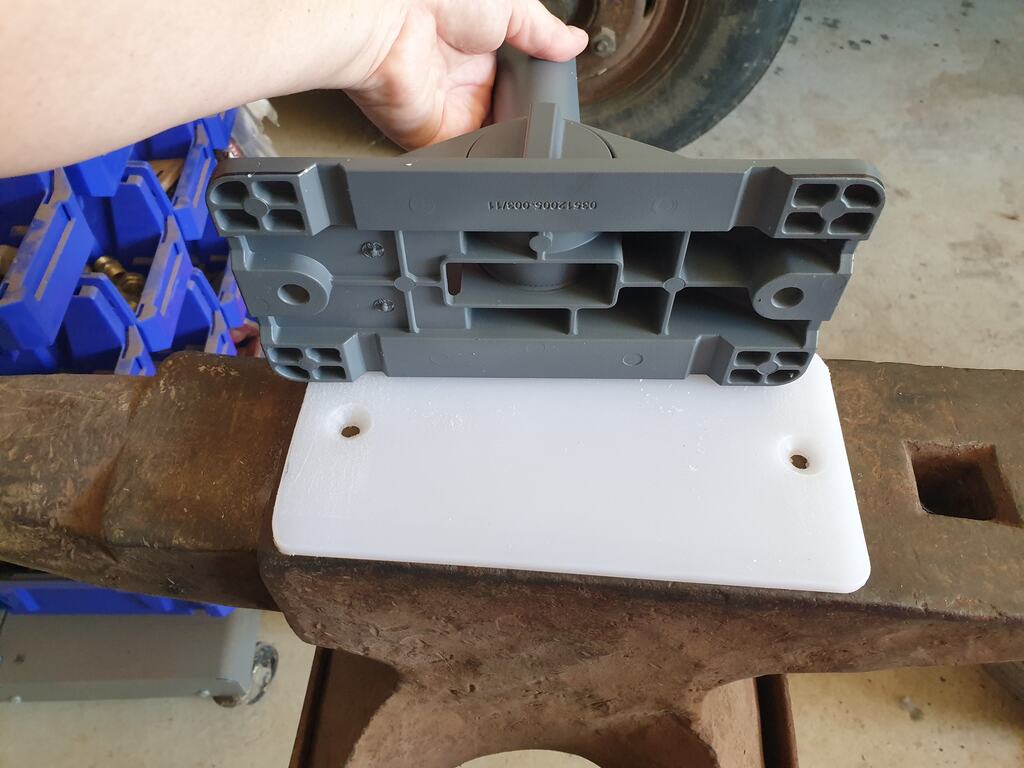
As with our solar panels, Larry decided to add silicone to the base of the roof dish holder. As the base of the holder doesn’t have much of a flat surface, Larry cut out a piece of a chopping board, screwing it and applying silicone to the base of the holder so that it had more surface area for contact.
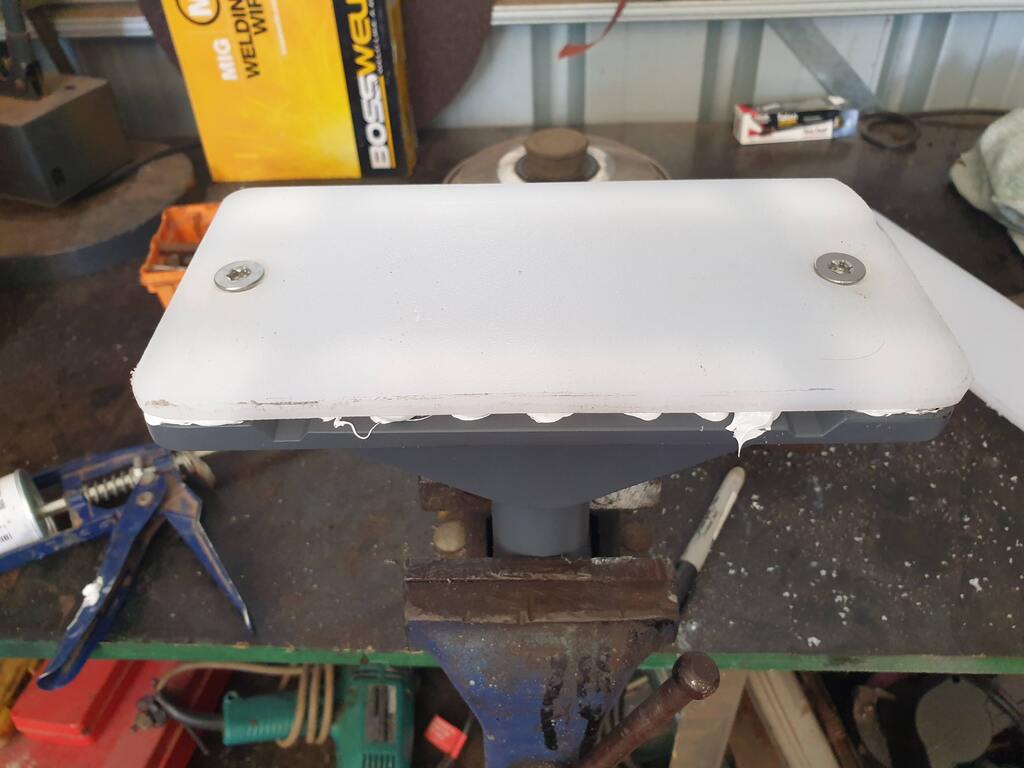
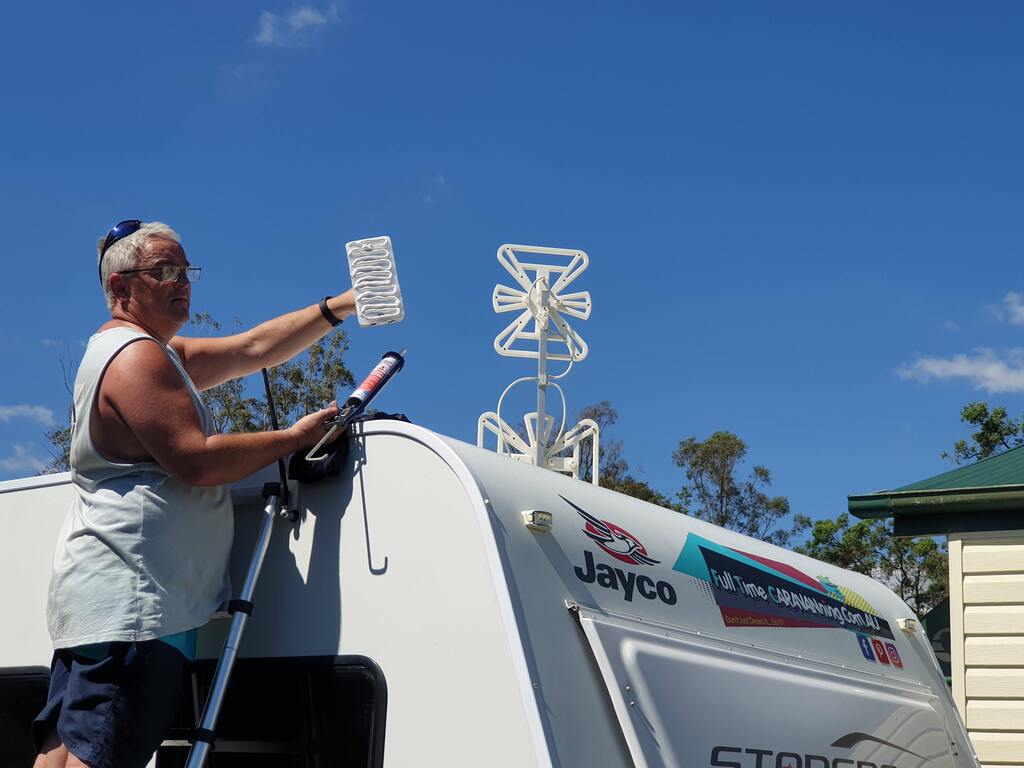

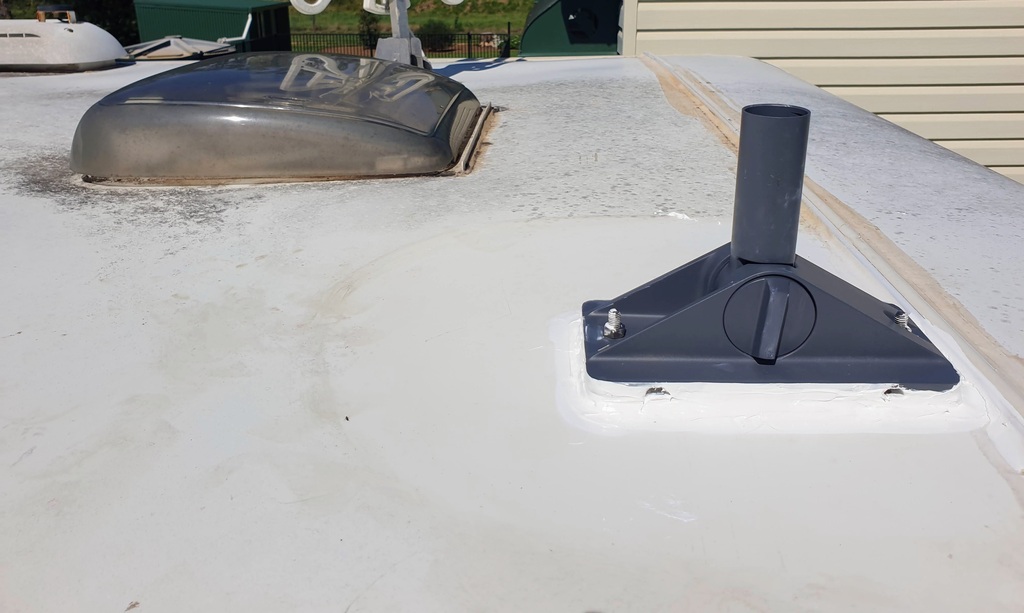
The Starlink RV dish holder was then put in to place on our caravan roof and siliconed on using 3m Marine self adhesive silicon. This stuff is exceptionally strong once cured. If you look at the photo above, the cylinder that the dish slides in to, folds down flatter.
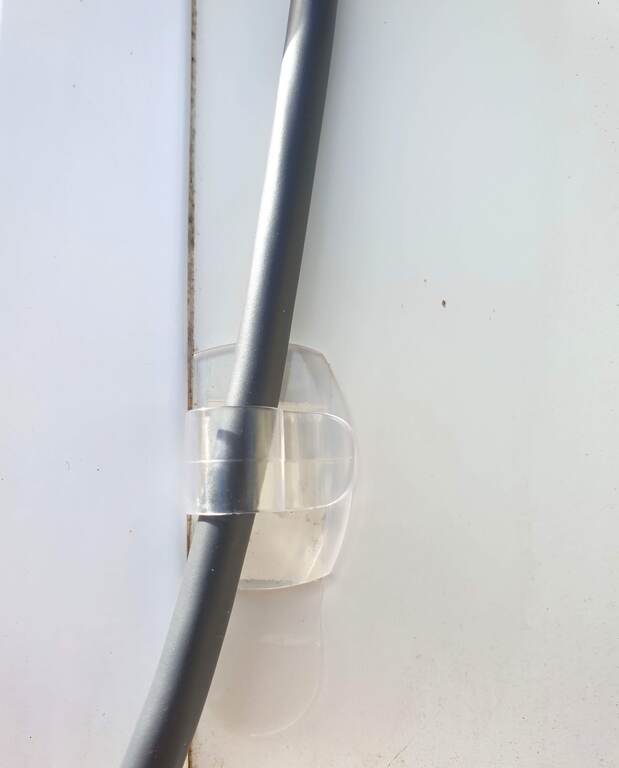
The long cable from the Starlink dish to the data socket is quite long. Larry bought some clips from Bunnings to hold it in place while the dish is on the roof, easily un-clipping when it comes down. This saves it dangling down over the window and flapping in the wind. Also, it looks neater. Speaking of which, he also attached a hook under the van to hook the extra cable on to.
To wrap up the how’s and why
Over to Larry again
Yes you can use Starlink RV Internet off grid on an inverter. As it has a start up of around 140watts when the dish is adjusting so you will need a 200w sinewave inverter at minimum but preferrably 400w to 600w. Alternatively, there is recent activity from Canada who have created a 48v device that can power your dish and router. It’s only a matter of time before a 12v version comes out. However you can get a 12v to 48v power supply to run it straight from a 12v battery but we will wait until a 12v version comes out.
Note from Larry:
The dish is powered by the router using what they call “PoE” Power over Ethernet. So it’s the router that is plugged into the 240v that sends the power through the Ethernet cable to make the dish move and operate. You can’t just plug the dish into a different router and walk away. For one, as mentioned the cable has proprietary ends so wont work for that reason, but also you need to power the dish via the router or by other means. Using the devices that are coming out now like mentioned from Canada, you can connect the device to your batteries, then power the dish via this new device and connect any router you want to the device, effectively allowing you to run the system from 12v and use either original router or an alternative router.
Back to Larry
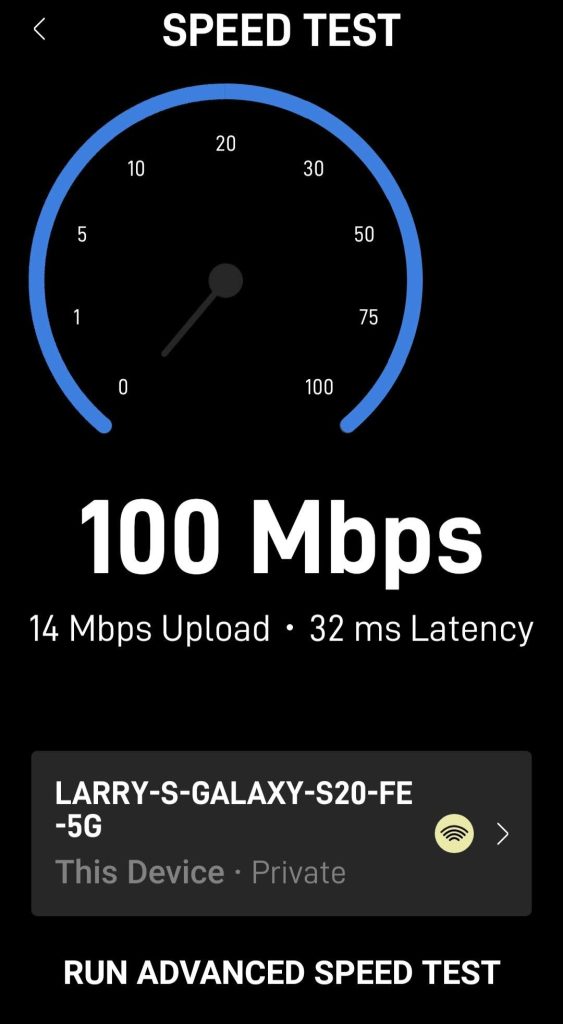
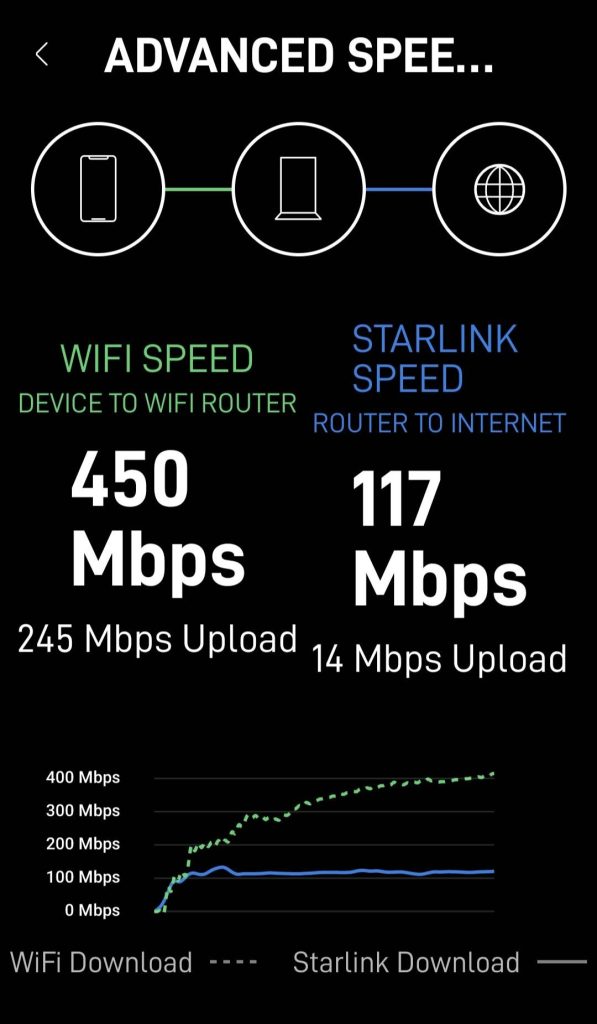
There is a option in the Starlink app to check router to device speed and router to dish speed. The 31ms latency is awesome compared to the likes of the NBN. The NBN is around 900ms. What does that mean ? well for Starlink, because the satellites are in low orbit it takes 31 millseconds (less than half a second) to send info to the satellites and get the signal back again. which basically means things load faster.
On a side note, as Larry did everything right, but still had no idea what was wrong or when it could be fixed he chose to buy a new cable. So now we have a spare to sell or store for the future.
We have used it for the last few months in rural areas and it works perfectly. We’re loving it so far.
As I always say “Everyone Is Different” this is what we do, this is how we find it 😀
For more tips and information from other travellers that use the Starlink RV Internet, check out “Starlink Nomads Australia – Mobile Satellite Internet” Facebook page.
Aussie House Sitters are our choice of house sitting sites. Use our Coupon Code “AHS15%off” for 15% off your joining fee


2 thoughts on “Starlink RV Internet & Ethernet Connection”
Thanks for all your helpful information on the setting up of Starlink and the mods. It will certainly be valuable when we are ready to install the system 😀
Regards Ro and Col
Hi Ro and Col
You won’t regret it. It dose what it says on the tin 😀 We’re loving it!
Comments are closed.